

A Barbie cake isn’t just a dessert—it’s a centerpiece, a conversation starter, and the highlight of many childhood memories. With its iconic design featuring a doll draped in a delicious, edible gown, it’s no wonder these cakes have become a go-to for birthdays and celebrations. Whether you’re making one for a child’s special day or simply embracing your creativity, this guide will help you bake, assemble, and decorate the perfect Barbie cake. From choosing the right flavors to crafting a dazzling dress, let’s get you set up for success in creating this magical dessert.
Table of Contents
What is a Barbie Cake?
Understanding the Concept of a Barbie Cake
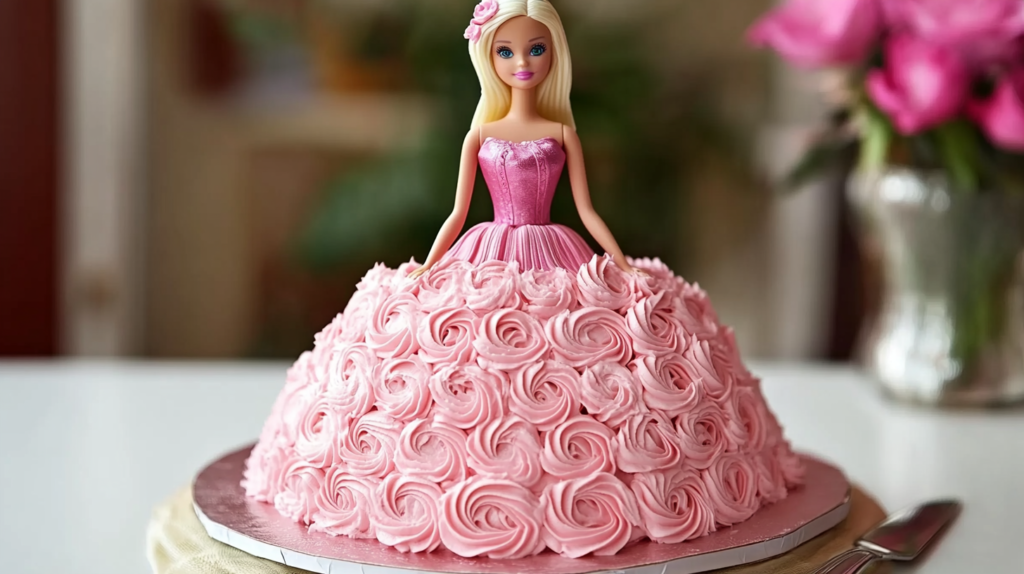
A Barbie cake typically involves a real Barbie doll (or a similar figure) inserted into the middle of a dome- or dress-shaped cake. The cake itself represents the Barbie’s skirt, and it’s decorated with frosting, fondant, edible jewels, and other embellishments to create the illusion of a stunning ballgown. The idea behind this design is to merge the magic of toys with the sweetness of dessert, making it an unforgettable treat at parties.
Why Are Barbie Cakes So Popular?
Barbie cakes are not just desserts—they are interactive, personalized creations. Kids love them because they feature their favorite doll in an edible form, and parents appreciate the creative flexibility they offer. You can tailor the cake’s design to match party themes, from princesses and fairy tales to unicorns and mermaids. Additionally, they’re great for photos and social media posts, thanks to their visually appealing and elegant presentation.
Tools and Ingredients You’ll Need
Essential Baking Tools
Before you begin, it’s important to have the right tools to ensure a smooth baking and decorating process. Here’s a list of must-have items:
- Mixing bowls and electric mixer
- Dome-shaped cake pan or 3-4 round cake pans (for layering)
- Cake turntable (for easy frosting application)
- Offset spatula for smoothing frosting
- Rolling pin (if using fondant)
- Piping bags and tips for decorative details
- Sharp knife for trimming the cake layers
Key Ingredients
To create a delicious and stunning Barbie cake, gather these core ingredients:
- Cake mix or batter: You can choose any flavor you like, such as vanilla, chocolate, red velvet, or lemon.
- Frosting: Buttercream frosting is popular because it’s easy to work with and can be flavored and colored as needed.
- Fondant (optional): For those who want a polished, smooth finish.
- Edible decorations: Think edible glitter, pearls, flowers, or candy embellishments.
- A clean Barbie doll: Choose one that fits the size of your cake, and wrap its lower body in plastic wrap to protect it from the frosting.
Step-by-Step Guide to Baking the Cake
Creating a Barbie cake begins with a solid cake base that’s sturdy enough to hold the weight of the doll and decorations. Let’s get those layers baked and ready to dazzle!
Preparing the Cake Base
Before you start mixing, decide on the flavor of your Barbie cake. Popular choices include classic vanilla, decadent chocolate, or a vibrant red velvet. Whatever you pick, make sure your cake is moist but firm to prevent it from collapsing under the Barbie cake’s weight.
Step 1: Preheat the Oven and Prepare the Pans
- Preheat your oven to 350°F (175°C).
- If using round cake pans, grease and line them with parchment paper to prevent sticking. For dome-shaped pans, use nonstick spray for even coverage.
Step 2: Mix the Batter
- Follow the instructions on your chosen cake recipe or cake mix.
- Mix until the batter is smooth, but don’t overbeat, as that could result in a dense texture.
- For extra flavor, consider adding vanilla extract, chocolate chips, or lemon zest depending on your theme.
Step 3: Bake the Layers
- Pour the batter evenly into your pans, making sure not to overfill them.
- If using multiple layers, bake them separately to ensure even cooking.
- A dome-shaped pan may take longer to bake (around 50-60 minutes) compared to standard round pans (25-35 minutes).
- Use a toothpick to check for doneness—if it comes out clean, your cakes are ready.
Assembling the Layers
Once your cakes have cooled completely, it’s time to build a sturdy base. This is where the magic starts to come together!
Step 1: Trim and Level the Cakes
- Use a serrated knife to trim off the domed tops, creating flat, even layers. This will make it easier to stack them securely.
- If you baked a dome-shaped cake, ensure that the top is even enough for the Barbie doll to stand without tilting.
Step 2: Apply Frosting Between Layers
- Spread a generous layer of buttercream frosting between each cake layer using an offset spatula. This will act as glue to hold the cake together.
- Stack the layers one by one, pressing down gently to ensure stability.
- For a taller cake, you can add 3-4 layers, but be sure to secure them with frosting for support.
Step 3: Carve the Skirt Shape (If Needed)
- If you’ve used round pans instead of a dome pan, you may need to carve the cake into a skirt-like shape.
- Use a knife to gently shave the edges, creating a gradual slope toward the base. Don’t worry about perfection—frosting will hide minor imperfections!
How to Insert the Barbie Doll
This is the moment where the cake officially becomes a Barbie cake!
Step 1: Prepare the Doll
- Clean the lower half of the Barbie doll with soap and water, then wrap its legs in plastic wrap to keep them clean and food-safe.
- Remove any accessories like shoes or extra clothing that could interfere with the insertion.
Step 2: Create a Hole in the Cake
- Using a knife or round cutter, carve a hole in the center of the cake large enough for the Barbie’s legs to fit snugly.
- Be careful not to carve too deep; the doll should stand upright without toppling over.
Step 3: Insert the Barbie Doll
- Gently insert the wrapped doll into the center of the cake, ensuring it’s secure and standing straight. If the doll feels wobbly, add a bit more frosting around the base of the hole to anchor it in place.
For inspiration on complementary desserts, link to the Ultimate Guide to Breakfast Pastries to provide additional ideas for sweet treats.
Decorating the Barbie Cake
Now that your Barbie is securely in place, it’s time to bring the magic to life with frosting, fondant, and edible embellishments. This step will transform your cake into the elegant gown of a princess, fairy, or any theme you desire. Let’s get creative!
Frosting the Cake Base
This step involves creating a smooth canvas for decorating. Whether you choose buttercream or fondant, a good base is essential for a flawless design.
Step 1: Apply a Crumb Coat
- A crumb coat is a thin layer of frosting applied to trap any loose crumbs and create a smooth foundation.
- Spread a thin layer of buttercream around the cake using an offset spatula.
- Smooth the surface as much as possible, and don’t worry about imperfections—this is just the base layer.
- Refrigerate the cake for 15-30 minutes to allow the crumb coat to set.
Step 2: Apply the Final Layer of Frosting
- Once the crumb coat is firm, apply a thicker layer of buttercream or fondant.
- If you’re using buttercream, smooth it out with a spatula or cake scraper for a polished look.
- If using fondant, roll it out to about 1/8-inch thickness, then drape it over the cake and smooth it gently with your hands.
Designing the Dress with Fondant or Buttercream
Now comes the fun part—turning the cake into a breathtaking gown that Barbie herself would envy!
Step 1: Shaping the Dress
- If you’re using buttercream, create pleats, ruffles, or swirls with a piping bag.
- Use a large star or petal tip to pipe rosettes, waves, or scalloped patterns around the cake.
- For fondant designs, cut out strips or patterns and layer them to mimic the flow of a dress.
Step 2: Adding Texture and Embellishments
- Fondant Drapes: Drape thin strips of fondant around the cake to create a flowing fabric effect.
- Edible Pearls and Flowers: Place pearls along the seams of the dress or scatter edible flowers for a whimsical touch.
- Piping Details: Use a smaller piping tip to add intricate lacework or bead-like designs.
Choosing a Color Scheme and Theme
The color and theme of the Barbie cake can tie into the overall party décor, making it even more special.
Popular Themes to Consider
- Princess Barbie: Pink and gold frosting with sparkly edible glitter.
- Fairy Tale: Soft pastels, butterflies, and floral embellishments.
- Mermaid Barbie: Shades of blue and green with seashell accents.
- Unicorn Theme: A mix of vibrant colors, edible rainbows, and sprinkles.
How to Incorporate the Theme
- Match the cake’s colors to the party décor or Barbie’s outfit.
- Use themed accessories, like a tiara made of fondant or edible jewels, to enhance the design.
Final Touches for a Dazzling Presentation
Once the dress is complete, a few finishing touches can make all the difference.
- Dust with Edible Glitter: For that magical sparkle, lightly dust the cake with edible glitter or shimmer powder.
- Add a Cake Topper: Consider adding a fondant banner or “Happy Birthday” topper near Barbie’s waist or the base of the cake.
- Decorate the Cake Board: Surround the cake with frosting swirls, edible flowers, or candy pearls.
Pair your cake with crowd-pleasing savory dishes like those in the Chicken and Shrimp Recipe Collection.
Common Mistakes to Avoid
To ensure your Barbie cake turns out picture-perfect, here are a few pitfalls to steer clear of:
- Overloading with Decorations: Too many details can overwhelm the design—keep it elegant and balanced.
- Weak Cake Structure: Use dowels or straws for support if your cake is tall or has multiple layers.
- Improper Frosting Consistency: If your frosting is too runny, it will slide off the cake. Chill it to achieve the perfect consistency.
Pro Tips for a Flawless Barbie Cake
Even if you’re a baking beginner, these tips will ensure your Barbie cake is sturdy, beautiful, and delicious. From structural tricks to creative design advice, let’s fine-tune your cake-making skills.
Tip 1: Cool the Cake Completely Before Assembling
Rushing to assemble a warm cake can lead to a melted mess. Always let the cake cool to room temperature or refrigerate it for at least 1-2 hours. This prevents frosting from sliding off and helps maintain the cake’s shape.
- Bonus Tip: Refrigerating the cake layers before assembly makes them easier to handle and less likely to crumble.
Tip 2: Level the Layers for Stability
Uneven layers can cause the Barbie to lean or the cake to collapse. Use a serrated knife to level each layer before stacking.
- Pro Tip: If you’re creating a tall cake (3 or more layers), use dowels or plastic straws inserted into the center to provide additional support.
Tip 3: Achieve a Smooth Finish with the Right Frosting Technique
A clean, polished finish takes practice, but these tricks can help:
- Spread a thin crumb coat to trap loose crumbs.
- Refrigerate between coats of frosting for at least 15 minutes to let each layer set.
- Use a bench scraper or cake smoother to get that professional look.
If you’re using fondant, dust your work surface with powdered sugar to prevent sticking and ensure an even roll-out.
Tip 4: Use Gel Food Coloring for Vivid, Custom Colors
Gel-based food coloring is better than liquid because it’s concentrated and won’t alter the consistency of your frosting or fondant. Customize the dress colors to fit the party theme—whether you want pastel pink, bold purple, or shimmering gold.
- Pro Tip: Mix different shades of frosting to create ombré or gradient effects on the gown.
Tip 5: Keep the Barbie Doll Stable
The doll must be securely inserted into the cake to avoid any mid-party disasters!
- Wrap the Barbie doll’s legs in plastic wrap, then press it firmly into the center hole.
- If the doll feels wobbly, add extra frosting around the base of the insertion point to help stabilize it.
For tall or multi-layered cakes, you can even anchor the doll using a wooden skewer inserted through the center of the cake.
Elevate the party with side dishes inspired by the Ultimate Pancake Breakfast.
Customizing the Barbie Cake for Different Occasions
While Barbie cakes are often made for birthdays, you can easily customize them for any event. Here are some ideas:
1. Princess-Themed Birthday Party
- Color Scheme: Think pinks, golds, and whites for a royal touch.
- Decor Ideas: Add edible tiaras, pearl accents, and a flowing fondant cape.
- Bonus Tip: Use gold luster dust on the fondant to give the dress a regal shine.
2. Baby Showers or Gender Reveal Parties
- Color Scheme: Soft pastel blues or pinks, or a mix of both for a surprise reveal.
- Decor Ideas: Incorporate tiny edible baby shoes, rattles, or pacifiers as cake decorations.
3. Unicorn or Mermaid Theme
- Color Scheme: Vibrant rainbow hues for unicorns or aquatic tones like teal, seafoam, and coral for mermaids.
- Decor Ideas: For unicorn cakes, use a fondant horn and edible rainbow accents. For mermaids, create scales using piped buttercream.
4. Bridal Showers
- Color Scheme: Elegant white, cream, or blush tones.
- Decor Ideas: Decorate the dress with edible lace, pearls, and floral motifs. A small fondant veil draped over Barbie’s head adds a nice bridal touch.
Adding Edible Accessories for Fun Themes
- Mini edible purses, shoes, and jewelry can be made using fondant or gum paste.
- Create an edible handbag to place next to Barbie for a fashionista look.
- Use food-safe edible glitter for a sparkling, over-the-top finish.
Storage Tips for Maximum Freshness
- Short-Term Storage: If you’re serving the cake within 1-2 days, store it in the refrigerator. Place it in a cake box or cover it loosely with plastic wrap to prevent it from drying out.
- Long-Term Storage: For cakes made in advance, wrap each layer in plastic wrap and freeze before assembling. Allow them to thaw in the fridge for a few hours before decorating.
Important Tip: Avoid keeping the cake in a warm environment, as the frosting and structure may soften or collapse.
Alternatives to a Traditional Barbie Cake
If making a full-sized Barbie cake feels too complex or you’re looking for a smaller option, don’t worry! There are plenty of creative alternatives that are just as charming and easier to make. Let’s dive into some fun, simpler ideas.
Don’t forget refreshing drinks—consider tea suggestions from the Guide to English Breakfast Tea.
1. Mini Barbie Cupcakes
If you’re short on time or want individual servings for party guests, mini Barbie cupcakes are a fantastic option.
- How to Make Them:
- Bake a batch of cupcakes using your favorite cake batter.
- Insert mini Barbie doll figurines or edible doll toppers into the cupcakes.
- Decorate the tops with frosting to resemble tiny skirts or ballgowns.
- Pro Tip: Use different colored frosting to create a rainbow of mini gowns, making them visually appealing on the dessert table.
2. Barbie Cake Toppers on a Regular Cake
For those who want a simpler version without carving or stacking layers, a Barbie cake topper might be the perfect solution.
- How to Do It:
- Bake a standard sheet or round cake and decorate it with colorful frosting.
- Add an edible Barbie-themed topper or a plastic Barbie doll seated on the cake.
- Surround the cake with edible decorations like stars, pearls, or flowers.
This option saves time while still offering the Barbie aesthetic!
3. Doll-Inspired Cake Pops
For bite-sized fun, you can make cake pops inspired by Barbie’s glamorous dresses. These are great for party favors or snacks.
- How to Make Them:
- Crumble baked cake and mix it with frosting to form small balls.
- Insert cake pop sticks, dip them in melted candy coating, and decorate each pop to look like a tiny Barbie dress or accessory.
- Pro Tip: Decorate with edible glitter or fondant bows to elevate the look.
4. 2D Barbie Cake (Flat Design)
A 2D Barbie cake is much easier to assemble and decorate compared to a full 3D version.
- How to Make It:
- Bake a standard cake (rectangular, round, or square).
- Use a stencil to outline Barbie’s silhouette on the cake.
- Fill the silhouette with colorful frosting or fondant, creating the appearance of Barbie in a dress.
This design is low-stress, requires minimal carving, and is ideal for beginners.
5. Barbie-Themed Dessert Table
If you want to ditch the idea of a single large cake, consider setting up a Barbie-themed dessert table instead!
- Ideas to Include:
- Mini cupcakes with Barbie toppers
- Cake pops and cookies shaped like dresses or accessories
- Cotton candy and candy jars in Barbie’s signature colors (pink, purple, gold)
This alternative works perfectly for large parties where guests can help themselves to different treats.
If you need gluten-free options, check out the Gluten-Free Fast Food Guide.
Frequently Asked Questions (FAQs)
1. Can I make a Barbie cake without fondant?
Absolutely! Buttercream frosting is a popular alternative to fondant and is much easier to work with. You can create stunning designs using various piping techniques like rosettes, waves, or ruffles.
2. How long does it take to make a Barbie cake?
The total time depends on your baking and decorating skills. For beginners, it may take 4-6 hours from start to finish, including baking, cooling, assembling, and decorating. For experienced bakers, it could take 2-3 hours.
3. How far in advance can I make a Barbie cake?
You can bake the cake layers 1-2 days ahead and store them in the fridge or freezer. Assemble and decorate the cake the day before the event to maintain freshness and appearance.
4. Can I customize the doll used in the cake?
Yes! You can use any doll as long as it fits within the cake structure. Mini dolls or themed Barbie dolls can add an extra special touch, depending on the occasion.
5. What cake flavor is best for a Barbie cake?
Vanilla and chocolate are classic options, but you can experiment with red velvet, strawberry, lemon, or even funfetti for a colorful surprise.
6. How do I transport a Barbie cake safely?
Place the cake in a sturdy box or container and secure it with non-slip padding. Keep it refrigerated until transport and drive carefully to prevent sudden movements from damaging the design.
Conclusion
Creating a Barbie cake is more than just baking—it’s a fun, artistic adventure that brings imagination to life. From crafting a beautiful edible dress to customizing the design for any party theme, a Barbie cake offers endless creative possibilities. Whether you go for a classic pink princess look, a magical mermaid vibe, or a glamorous unicorn theme, this cake is sure to be the centerpiece of any celebration.
With the right tools, proper planning, and a few pro tips, you can easily create a show-stopping dessert that leaves your guests in awe. And if you’re not ready to tackle the full 3D version, the alternatives we discussed, like cupcakes and 2D designs, are just as magical. Remember, there’s no wrong way to design a Barbie cake—it’s all about making it special for the occasion.
Now, it’s your turn to grab your apron, unleash your creativity, and bring a touch of Barbie magic to the table. Happy baking!